by Loreena Walsh | Camping, Trip Planning
This sort of goes without saying, but it needs to be said. It is SO much more enjoyable to plan and execute a camping trip if you’re prepared. I have to admit that I’m a last minute packer, that means trying to grab everything at the last minute and throw it into bags and tubs and load it into the car with a flurry of “mum can I take this” and “where are my shoes” and “Matt…. have you seen _______ (insert a long list of things right here!)”. I’m the first to admit however that this is NOT the best way to start your camping trip.
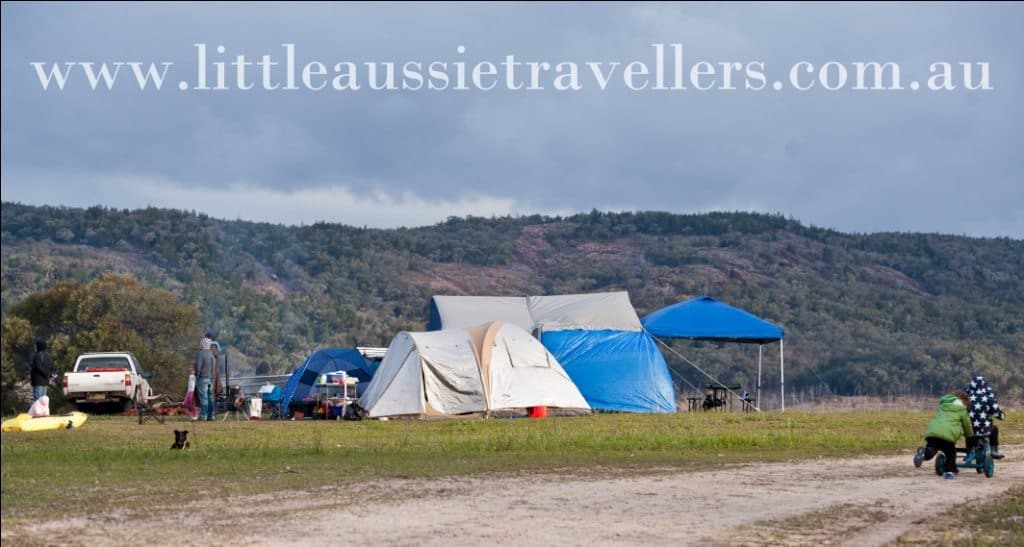
We love camping across Australia with our kids, and lucky for us, our kids for the most part, seem to like camping! It may have something to do with the fact that they all started camping at only a few weeks of age and it’s been a part of our lifestyle their entire lives. While this advice is targeted toward shorter family camping trips, if you’re heading off long term it can definitely help you too.
1. Pre Packed Camp Gear

If you’re regular campers then I can suggest that keeping allocated tubs of camp gear stored and ready to go is a sure fire way to make packing as easy as it can be. These tubs should be organised (labelled if you’re into that!) and full of essential items that you drag along each and every time you go camping. An example is keeping a kitchen tub full of plates, cutlery, cooking utensils, frypan, tea towels etc, etc. Another useful tub if you camp regularly is non perishables such as sugar, tea, coffee, tinned and packet products that you always seem to use, oil etc. One more idea is to keep your first aid kit either in your car or ready packed and handy. There’s plenty of other things you can store pre-prepared that will save you time.
2. Lists & Notes:
Lists: If you don’t camp regularly or are a little disorganised like we are sometimes 😉 then it pays to make lists. Lists are your friend! The only way I manage to survive the “last minute pack & run” when we camp is to have lists preprepared that allow me to check things off as I throw them into bags and the car. You can create lists for everything and almost every camper I know has pre-prepared lists to help them ensure they don’t leave behind essentials. Main list ideas are: 1 list for each member of the family, a list for cooking items, a list for tent/accommodation/bedding, a list for electricals, a list for pets if you’re taking them, and anything else you can think of!
Notes: Australia is a big country and if you’re heading into new regions, or even if you’re visiting an old favourite destination there are some things you should note down before you head off on your trip. Where is the location of your campground? Where is the nearest town? Directions for how to get there (step by step), a contact list of emergency or important numbers for the area, meeting times and numbers of people you’re meeting up with. It might sound primitive to make notes (I recommend on paper) but the reality is that there isn’t always mobile phone service, and what if something happens to your phone or gps device and you don’t know details. It’s important to stay safe!
3. Essential Items
There are a couple of vital things we always take with us on a camping trip, so here’s a quick list of essential items we recommend you pack during your preparations, we find that these things may not be on the top of everyone’s list but they are really handy. If you’re going on a long term trip of course these items will be important but there’s many more you need to add. This list is great for short camp trips.
- Torches – enough to go around (one is generally NOT enough)
- Sewing kit – has many purposes but most people don’t carry one
- Batteries!- Easily forgotten and needed for many items (especially torches)
- Water – If you don’t have your own water storage bottles, grab at least a 10 litre container/s from your local supermarket
- Washing up tub – Don’t forget this, it makes cleaning up so much easier!
- Toilet paper – You have no idea how handy this is until you need it and don’t have it!
- Billy/Saucepan for boiling water along with a sharp knife and chopping board (makes life a whole lot easier)
4. Pack Smart – Don’t Overdo it
Even after years and years of camping experience we still tend to over pack. Now that might not sound like a bad thing right? But in reality, for short camp trips if you pack it to take it with you, you have to unpack it when you get home. for longer trips, you really don’t want to be carting around excess “stuff” it not only adds to weight but takes up valuable room too. Going back to step 2 will help reduce the risk of overpacking somewhat. List all the essential items you will need for each family member and try to stick to this. Tips for packing smart include:
- Know the weather forecast and pack accordingly
- Don’t take excess toys – your kids will have much more fun if they can explore nature without being tempted by things from home
- Research facilities – When we camped at Copeton Dam we didn’t realise there were hot showers and carted our gas water heater unecessarily!
- Pre-plan your meals – have some idea of what you’ll be cooking and resist the urge to pack excessively, especially true for perishables!
5. Plan your arrival time
This little gem can make all the difference to how enjoyable your camping trip is believe it or not! Be sure you know the approximate travel time to your destination, and plan to arrive in daylight! We’re pretty experienced at setting up camp in the dwindling light, or even dark but can definitely tell you it’s so much easier and faster to set up in daylight! Another consideration is the time of year you’re camping. If you’re travelling over the holidays or during a popular camp season, then you can be sure that there will be plenty of other campers looking to nab the best spot too, so if you’re going somewhere there’s likely to be crowds, give yourself plenty of time to get there and get a great spot, or if possible book ahead and request any specifics you might need if possible. It’s always a good idea especially when travelling with kids to plan to arrive when it’s not a major meal time, if you can’t escape that, then be sure to have an alternative easy meal planned or good snacks to get everyone through until camp is set up.
What are your tips for Camping Preparation? We’d love to hear in the comments below!
by Loreena Walsh | Camping, Gear Guide
Ever wondered what the best camping sleep gear is? Self Inflating mattresses, air beds, eva mats, swags, foam mattresses, camp bunks, camp beds….. there’s a whole lot of choice.
If you’re travelling in a camper trailer or caravan, then chances are, you’ll be sleeping on a high density foam, or even an innerspring mattress. If you’re using a tent/swag or similar, then chances are you’ll be needing to find the most comfortable, yet cost effective way to sleep in some sort of comfort. The same dilemma occurs for those families who have children sleeping in annexes or outside of the main bedding within any camp set-up as tends to happen with larger families, or older children, being easily transportable, yet comfy enough for a good night’s sleep are the main criteria.
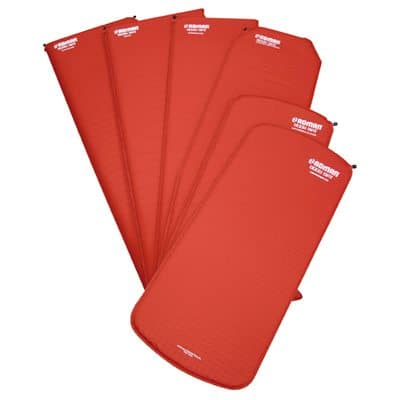
SELF INFLATING MATTRESSES:- Ranging from around $70.00+
A self inflating mattress is in fact a foam mattress that has an outer cover on with valves which can be opened and closed. The air is able to be squeezed out of the mattress so it can be squashed down to a smaller size to allow for easier transportation. When arriving at your destination, simply grab the mattress out of the bag/roll, undo the valves and leave it to sit for half an hour -an hour to draw the air in by itself. There is a wide range of self inflating mattresses available on the market, ranging from those suitable for bushwalkers or trekkers starting at around 28mm thick to queen size at around 10-15cms thick. There’s some advantages, such as no pump being required and greater insulation from the cold ground, however Self inflating mattresses can be bulky (especially the larger sizes) and can be more expensive.
EVA FOAM MATS:- Ranging from around $10+
These mats are sometimes known as yoga or exercise mats that are often used when people need to travel light. These mats are extremely light weight, they don’t provide much padding or comfort, but they do help to insulate your body from the cold of the ground. Sizes and thickness vary, generally in thickness from 8mm to 20mm.
AIR BED or INFLATABLE MATTRESS:- Ranging from around $20+
These are a great and comfortable option if you can find one that stays inflated while you sleep! They can be comfortable and come in a range of sizes, although they are not without their problems. In winter, an inflatable bed is cold and it’s important to place a blanket or even one of the eva foam matresses down where you will lay, to protect yourself from the cold air circulating underneath you. It’s also important that you have the gear needed to inflate the matress. Generally a 12v air pump which is relatively inexpensive works well.
CAMP BUNKS or CAMP STRETCHERS:- Ranging from around $25+
These are a great option for kids and adults alike with a huge range of sizing, pricing and styles. Take some time to try the beds out in store if possible and lay down to feel if a particular stretcher suits you. This style of bed generally packs done to be small and the frame packs away by either pulling apart or folding. Lightweight and they don’t take up much room, it might be necessary to use an eva foam mat during colder months to add some protection from the cold air that may flow underneath the bed.
[nggallery id=2]
by Loreena Walsh | Camping, Food
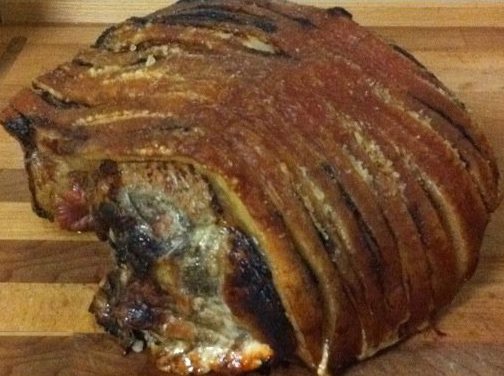
I must ashamedly admit that until our awesome weekend out to Copeton Dam I’d never cooked a camp oven roast before!
Seeing as we were heading out there for a couple of days with some wonderful friends we thought what better time to take along a leg of pork that we’d been saving in the freezer. (Living on a farm, this was our first and only pig we’d raised ourselves as food and oh boy is it tasty!)
We got the men to stoke up the main campfire before they headed fishing for the afternoon, ready for our attempt at a scrumptious campfire roast! (I’ll apologise now for the lack of photos!)
PREPARING THE MEAT:
Firstly, pork isn’t generally the kind of meat you’d cook in a camp oven, but we’re all for using what you’ve got and giving anything a go (almost!) while you’re camping so we thought we’d give it a try anyway.
For this roast, we used oil and salt rub to prepare the meat in an attempt to get some crackling. The chances of great crackling in a camp oven aren’t the best but we were keen to try!
For cuts such as beef and lamb, or even chicken, I’d suggest a light oiling, or just a quick spray with some spray oil if you have some.
PREPARING THE VEGETABLES:
We used carrot, pumpkin and washed potatoes with skin on and were feeding 4 adults and 5 children ranging in age from 1 – 8 yrs. The amount of veggies you cook and the type (what we used is recommended as well as things such as sweet potato etc – veggies that don’t go to soggy and roast well) will depend on the number of people you’re cooking for and the size of your camp oven.
Simply wash and/or peel as usual and cut the veggies into a medium size – too small and they may burn & dry out or go to mush, and too large and you might have troubles getting them to cook through.
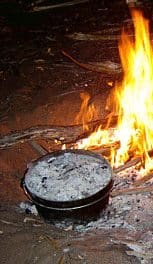
PREPARING THE FIRE
You need to make sure that you don’t sit your camp oven right on top of a roaring fire. It needs to be close enough to the fire to keep the cooking momentum going, but not so close as to burn. We placed ours maybe about half a metre away and shovelled some coals and made a nice flat hot coal area for the camp oven to sit on. Once we placed our meat inside we shovelled hot coals on top and every once in a while when it looked as though the heat was disappearing, we’d scoop some fresh coals both under and on top of the camp oven.
HOW TO COOK YOUR ROAST:
Firstly we put on our roast by itself. The meat will take a while longer than the veggies depending on the size, but ours was quite large, so it was on for a good hour – hour and a half before we put our veggies in. It’s important not to keep opening the lid, this is especially note worthy if you’ve put coals on top as the last thing you want is to be eating ash and coals with your dinner! After about an hour and a half, we threw all our veggies in on top of the yummy looking roast, put fresh coals under and on top of the camp fire and left it cooking for another hour and a half or so. I don’t know the exact time because we were busy sitting by the fire drinking beer bathing the kids and all those important things.
THE RESULTS:
Were super, dooper YUMMO! Between the 9 of us we polished off the entire roast and all the veggies! Super proud of my first ever camp oven roast. The only downside was that the wind was SO FREEZING that by the time we plated up everyone’s dinner and sat down to eat it, which didn’t really take us too long at all, everyone’s food was as cold as it would feel if you’d just pulled it out of the freezer! But cold or not it was yummy all the same. So if I can pull it off with no camp oven cooking experience, don’t be scared, just give it a go, it will be worth it!
I’ll be updating the site soon with an official guide to camp roast cooking which will have a little more specific instructions compared to my inexact advice – so stay tuned!